See more of his images at: www.life.com/image/50695728/in-gallery/24871
Friday, 30 October 2009
Brightdancing
Thursday, 29 October 2009
28 Oct 09: Software #3 - remote shooting
My camera is a Canon EOS 50D. The Canon EOS utility software allows you to adjust your camera settings and remote shoot by "tethering" the camera to a computer. When you attach your camera through a USB port and select Camera settings/Remote shooting from the EOS utility menu the following control screen appears:
This allows you to adjust the aperture, shutter speed, ISO etc exactly as you can on the camera itself. Then by clicking on "Remote Live View Shooting" an image is taken and fed directly to the computer where it can be instantly viewed on screen:
Selecting Other Functions from the control screen allows you to take a test shooting image:
This shot also shows the set up menu, where you can add your name as a tag which will attach to all your photographs with a copyright notice.
Using the camera in this way is really useful for trying out different camera settings on the same image composition and quickly being able to review them to see how the settings alter the appearance of the image.
This allows you to adjust the aperture, shutter speed, ISO etc exactly as you can on the camera itself. Then by clicking on "Remote Live View Shooting" an image is taken and fed directly to the computer where it can be instantly viewed on screen:
(The corner of my desk)
Selecting Preferences from the control screen allows you to set the folder the images will be downloaded to, update basic settings etc.
Selecting Other Functions from the control screen allows you to take a test shooting image:
This shot also shows the set up menu, where you can add your name as a tag which will attach to all your photographs with a copyright notice.
Using the camera in this way is really useful for trying out different camera settings on the same image composition and quickly being able to review them to see how the settings alter the appearance of the image.
28 Oct 09: Studio lighting practice #3: Objects
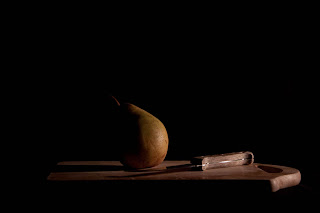
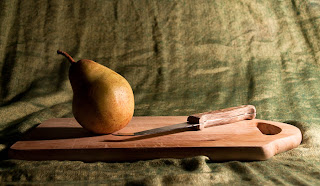
Working on my own this time, I wanted to create really strong shade, so that one side of the fruit was in shadow, and to create texture on the surface of the fruit. To do this I set up the product table with a black reflective board to the left and the light source level with the fruit and shining directly from the right. I tried using a black background to create that traditional still life effect and also a coloured and textured background to try and add interest by picking up on the colour and texture of the fruit.
First shot - f/8.0 1/125 sec but I forgot to connect the flash! The low key-effect does make it quite atmospheric
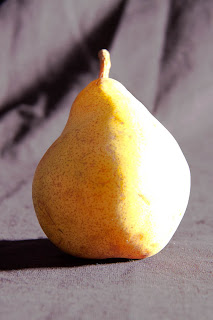
First shot - f/8.0 1/125 sec but I forgot to connect the flash! The low key-effect does make it quite atmospheric
.

This was a better attempt once the flash was connected and I tried a different background
.

Then I moved the light source closer and turned up the intensity but got a very overexposed result
I stopped down thorugh several apertures to f/29 to get the best result so far:
Then I tried a close up on the black background - I like the way this shows the texture of the fruit but the highlights are very clipped

Changing the angle of the shot helped to reduce the over exposure on the right
Then I tried using a wooden board as the background in a close up to give a more rustic feel
These are the closest to what I was hoping to capture as they do show the texture of the fruit. The first two still suffer from some overexposure but by taking a real close up and avoiding the part of the fruit that was reflecting the light I think the third one makes an interesting shot.
The end
25 Oct 09: An experimental day in Wales
Standing on top of a Welsh mountain in what felt like a force 10 gale, I was watching the shafts of sunlight falling through breaks in the cloud onto the sea and wondered if it was possible to capture that type of light with a camera - this was my best attempt at capturing the shafts of sunlight (although it has to be said I could hardly stand up never mind take a photo)
...perhaps it needs to be left to painters such as James D Preston who captures them brilliantly, for example, in his picture Misty Glen:
(It is actually possible to add the effect of diffuse sunlight using Photoshop and something I want to take a look at doing when i get the time).
Later on the beach I wanted to take some pictures of the sea but the light was very flat, grey and dull...
...so I tried some shots on various settings with a long shutter speed - this is what I got with every setting....
...mmm!
In the pouring rain I decided the best option was to go to the pub, turning round to head back up the beach I got these
As rainbows are so ephemeral I wasn't sure if it would actually come out on a photo - glad I tried it though!
f/11 1/125sec
(It is actually possible to add the effect of diffuse sunlight using Photoshop and something I want to take a look at doing when i get the time).
Later on the beach I wanted to take some pictures of the sea but the light was very flat, grey and dull...
...so I tried some shots on various settings with a long shutter speed - this is what I got with every setting....
...mmm!
In the pouring rain I decided the best option was to go to the pub, turning round to head back up the beach I got these
As rainbows are so ephemeral I wasn't sure if it would actually come out on a photo - glad I tried it though!
Wednesday, 28 October 2009
Tim Flach
Love his photos - take a look at http://www.timflach.com/
Flach's horse photos also remind me of the paintings of George Stubbs such as Whistlejacket - its just something about the 'quality' of the horses:
Flach's horse photos also remind me of the paintings of George Stubbs such as Whistlejacket - its just something about the 'quality' of the horses:
Monday, 26 October 2009
22 Oct 09: Sodium Lighting/shutter speeds (Blackpool Illuminations)
Couldn't have a trip to Blackpool without getting some pictures of the illuminations
and it was an opportunity to try out using the bulb setting on my camera.
At first the images were coming out very orange due to the sodium lighting:
so I adjusted the aperture from f/16 to f/29 and the colour turned on
and it was an opportunity to try out using the bulb setting on my camera.
At first the images were coming out very orange due to the sodium lighting:
so I adjusted the aperture from f/16 to f/29 and the colour turned on
This was taken at f/32 using the bulb setting to give an exposure of 2 seconds as a tram went past
and this has a 5 second exposure
I like it!
22 Oct 09: The magic hour in Blackpool
I had to have another try at some magic hour photos. I like these taken in Blackpool just as the sun was setting. The light was changing really fast so I had to work quickly and there were so many potentially great shots that I was like a kid in a sweetie shop. Here's a sample of what I took...
f/5.6 1/30sec some tone curve adjustment in Lightroom 2
f/8 1/30 sec some tone curve adjustment
f/8 1/30 no adjustment
f/16 1/15 some tone curve adjustment
f/5.6 1/60 sec some tome curve adjustment
f/5.6 1/60 some tone curve adjustment
f/16 1/4 sec some tone curve adjustment
f/8 1 sec no adjustment
All taken with Canon EOS 50D and EF-S 18-200 IS lens.
One issue I am finding when I come to review photos is that the colour tone looks different depending upon which screen I view them on (obviously due to different screen resolutions) and different again when I print, them. So I don't know how they are going to look when other people view them. Must ask John about this.
21 Oct 09: Studio lighting practice #2: Objects
This time in the studio we tried out the use of some modifiers as required in our assignment on the quality of light. In the studio light can be modified using, for example, a honeycomb or beauty dish (see blog from 30 Sep 09: Lighting #1 an introduction).
Honeycomb
A reflector directs the light in a narrow beam; adding a honeycomb softens the beam but still gives a harsh effect when photographing a glass bottle. The narrow beam directed onto the subject from 45 degrees also creates a strong shadow:
Honeycomb
A reflector directs the light in a narrow beam; adding a honeycomb softens the beam but still gives a harsh effect when photographing a glass bottle. The narrow beam directed onto the subject from 45 degrees also creates a strong shadow:
Beauty dish
A beauty dish casts light at a wider angle than the reflector and can be used with a diffuser which gives a softer light and less defined shadows:
(Low and high key takes).
Or without a diffuser which gives a harder light:21 Oct 09: Software #2: Photoshop CS4
Images can be exported from Lightroom 2 into Photoshop for further editing. In Lightroom the options for exporting can be found in the drop down File menu on the top toolbar:
Selecting Export will bring up export options which allow you to select where the image will be exported to, the file format and the size of the exported image:
Selecting Export will bring up export options which allow you to select where the image will be exported to, the file format and the size of the exported image:
Available file types are:
JPEG - suffers "lossy" compression
PSD - ) lossless compression
TIFF - )
DNG - a RAW format
Original
The quality bar sets the amount of compression. The more compression there is the less good the image will look.
The image can be resized according to how it is going to be viewed. For printing or archiving a ppi of 240 is recommended. For viewing on screen a long edge of 900 pixels and 72 ppi is acceptable.
In Photoshop there is a huge range of tools available for manipulating the image. Unlike Lightroom, Photoshop is destructive - the original image is overwritten when edits are saved. However, you can use layers to make any edits which preserves the original underneath. Multiple layers can be used each with a different type of edit and different effects can be achieved by changing the order of the layers. The layers menus - drop down and panel on right - are shown on the screen shot below:
There is also a tool bar on the left, which has tools such as:
- Rotate
- Pen
- Blur
- Eraser
- Spot healing
Other options are avialable from the drop down menus such as the Image menu - shown below - and filter menu.
Subscribe to:
Comments (Atom)


