Lightroom 2 is an example of non-destructive digital asset management software ie it does not destroy the original as adjustments are made. It is designed to work in partnership with Adobe Photoshop CS. Whilst Lightroom 2 can process raw files very quickly and allows global adjustments to an image, Photoshop has more flexibility in local adjustments and so gives a greater level of creative control.
Lightroom 2 has 5 modules highlighted on the top left of the screen shot below. These are:
- Library = for importing and organising images
- Develop = for manipulating images
- Slideshow ) for viewing
- Print ) and exporting images
- Web ) to other types of media
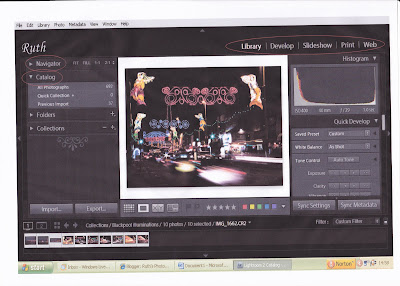
The screen view can be adjusted by using the:
- F key to remove or return the frame (menu bar)
- L key to dim the lights and turn them on/off
It also includes the Catalog and Folders areas. This area of the menu allows control over importing images and organising their storage. When images are initially imported they are stored in folders in date order and it is best practice to retain all the original images in this catalog system. New folders can be created in Collections from where they can be manipulated using the Develop module (see below).
It is recommended that a back up of the Catalog and Folders is done at least monthly.
All the menus on the side bars can be turned on and off using the individual arrow keys or using the "TAB" key. The screen shot below shows what the screen looks like withleft and right side menus off: 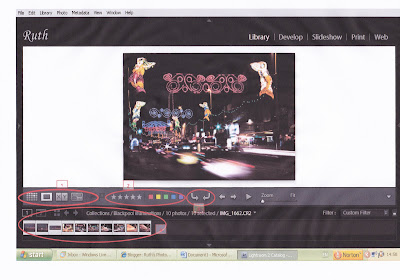

The icons highlighted at 1 above are used to select the image view from:
- Multiple Grid (G)- Loupe (E) (using the Z key allows you to zoom in/out whilst in loupe view)
- Compare (allows you to use the arrow keys to scroll through the images whilst comparing 2 or more) (C); or
- Survey (using the shift key allows you to select multiple images) (N)
You can quickly move between these views using the keys indicated above.
It is possible to add ratings and flags to images with, for example, stars and colours - see highlight 2 on image above - or by adding keywords and then use these flags to filter and select pictures. Using the shift key to select a number of pictures allows them to be flagged at the same time ie they don't have to be done individually.
The arrows highlighted at 3 above can be used to rotate the images.
At the bottom of the screen the filmstrip (4) can be used to navigate through the images.
Shown on the screen shot below is the expanded Navigator area and also, the expanded Collections area. Also, on the top right it shows the histogram which evaluates and gives a graphical description of the tonal range:
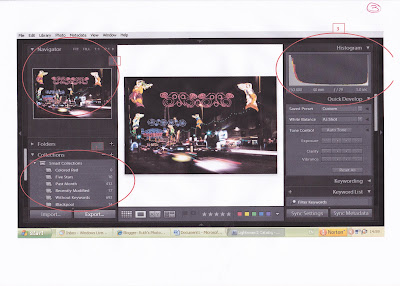
The left of the histogram shows the shadows, the middle shows midtones and the right shows highlights - 2/3 of a digital camera's sensitivity is dedicated to capturing the right-hand 1/3. If the histogram runs off the end of the chart this shows that detail has been lost in the image - this is known as clipping. The aim should be to "shoot to the right" so that areas of highlight are captured but to avoid clipping.
Underneath the histogram are some quick editing controls. The main controls for manipulating the image are found in the Develop module shown on the picture below: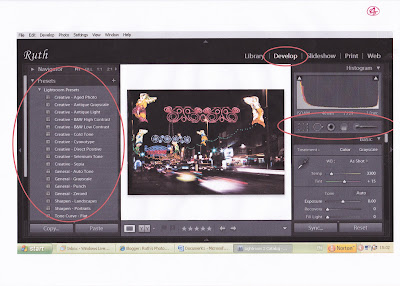

To the left are Presets, which are a quick way of making an adjustment eg to convert an image from colour to black and white. In addition to the presets supplied with Lightroom 2 further presets can be downloaded or you can create your own. On the right-hand menu are various tools, for example, at the top are the:
- Crop tool which can be used to crop the image (the aspect ratio can then be used to resize/shape) and to straighten the horizon.
- The clone tool which can be used to remove spots (eg from dust marks on the sensor). This can be used to synchronise with other photos so they can be batch processed which really speeds things up. (The bracket keys can be used to make the dust spot larger or smaller).
- Red eye tool
- Graduation tool - used, for example to graduate the sky.
- The adjustment brush can be brushed over a localised are to adjust the exposure, soften skin, brighten eyes etc.
Other tools not all shown on the screen shot allow adjustments to:
- Clarity which helps with local contrast
- Colour temperature - to make the picture warmer or cooler
- Fill Light - to reveal detail in the shadows
- Recovery - recovers highlights
- Tone curve - changes white, black and grey tones
- Hue and saturation - affects each individual colour tone
- Luminance - to correct skin tones eg orange luminance removes spots and freckles
- Sharpening
This allows you to retrieve any stage including the original.
Within the Library module it is also possible to review and amend the Metadata attaching to the image - see illustration below:
It is possible here to add your name and copyright the image before publication.
Once an image has been manipulated in Lightroom it can be exported to other media including Photoshop. This is covered in my next blog.


No comments:
Post a Comment